2017년 7월 11일 화요일

Spring Boot Security 연습

소스:

https://github.com/julyinsung/springboot/tree/master/boot_mvc_security

환경:

Type: gradle
Packaging: Jar
Java Version: 1.8
Boot Version: 1.5.4
MyBatis, MySQL, Thymeleaf, Web, Security

참조:

thymeleaf security : http://www.thymeleaf.org/doc/articles/springsecurity.html
security tag lib : http://docs.spring.io/spring-security/site/docs/4.2.x/reference/html/taglibs.html
security javascript expression: https://stackoverflow.com/questions/41434231/use-spring-security-in-thymeleaf-escaped-expressions-in-javascript
spring security reference :  http://docs.spring.io/spring-security/site/docs/4.2.3.RELEASE/reference/htmlsingle/
spring boot security 예제: http://cusonar.tistory.com/10
spring boot security 예제: http://zgundam.tistory.com/51
spring boot security 예제: http://www.namooz.com/2015/12/07/spring-boot-thymeleaf-10-spring-boot-security-final/
spring boot security 예제: http://syaku.tistory.com/286

개요:

user, role 테이블 생성, login  page 생성하여 Spring Security를 연습한다.

설명:

프로젝트 구조는 아래 그림과 같다.


Security설정은 SecurityConfig.java 클래스에서 한다.
소스에서 첫번째 configure메소드에서는 접근제한을 설정하고
두번째 configure메소드에서는 패스워드 암호화 설정
마지막 passwordEncoder메소드는 암호화 방식을 Bean으로 등록하여 다른 클래스에 주입하여 사용할 수 있다.

CustomUserDetailsServioce.java
UserDetailService를 implements한 CustomUserDetailsServioce.java는 login페이지에서 받은 login_id로 user테이블과 role테이블을 조회하여 UserDetails을 implements한 User 도메인에 적재한다.

user 와 role 테이블의 sql은 여기 참조.

로그인페이지와 로그인후 페이지는 아래와 같다.
로그인후 상단에 로그인 정보를 보여주기 위해서는 security tag가 필요한데 build.gradle 설정페이지의 dependencies에 compile('org.thymeleaf.extras:thymeleaf-extras-springsecurity4') 를 추가한다.

로그인 화면
로그인 후
로그인후 상단에 뿌려지는 정보는 default.html 페이지에서 확인할 수 있다.
먼저 페이지에 xmlns:sec="http://www.thymeleaf.org/thymeleaf-extras-springsecurity4" 을 추가(소스는 여기)하고 sec:authentication 태그를 이용한다.(소스는 여기)

2017년 7월 4일 화요일

Spring Boot Webjar 연습

소스:

https://github.com/julyinsung/springboot/tree/master/boot_mvc_webjar

환경:

Type: gradle
Packaging: Jar
Java Version: 1.8,
Boot Version: 1.5.4
MyBatis, MySQL, Thymeleaf, Web


참조:

http://www.namooz.com/2015/12/02/spring-boot-thymeleaf-9-webjars/
도서: spring mvc4 익히기

개요:

webjar를 이용하여 구성.

설명:

프로젝트 구성은 이전 Mybatis 연습과 동일


build.gradle에 설정 이때 bootstrap 대신 materialize 사용
 compile('org.webjars:jquery:2.1.4')
 //compile('org.webjars:bootstrap:3.3.4')
 compile('org.webjars:materializecss:0.96.0')

아래 html에서 보듯이 이 자원의 접근경로는 /webjars 밑에 위치하게된다.
<link href="https://fonts.googleapis.com/icon?family=Material+Icons" rel="stylesheet" />

<script th:src="@{/webjars/jquery/2.1.4/jquery.min.js}"></script>

<script src="/webjars/materializecss/0.96.0/js/materialize.js"></script>

<link href="/webjars/materializecss/0.96.0/css/materialize.css"
 type="text/css" rel="stylesheet" media="screen,projection" />

2017년 7월 3일 월요일

Spring Boot Mybatis 연습


소스:

https://github.com/julyinsung/springboot/tree/master/boot_mvc_mybatis

환경:

Type: gradle
Packaging: Jar
Java Version: 1.8,
Boot Version: 1.5.4
MyBatis, MySQL, Thymeleaf, Web


참조:

https://github.com/sivaprasadreddy/springboot-tutorials/tree/master/springboot-mybatis-demo
http://www.mybatis.org/spring-boot-starter/mybatis-spring-boot-autoconfigure/
http://sivalabs.in/2016/03/springboot-working-with-mybatis/
http://www.donnert.net/82
http://jsonobject.tistory.com/225

개요:

Mybatis를 설정한다.

설명:

프로젝트 구성은 그림과 같이 controller, domain, mapper, service 그리고 mapper XML파일은  resources 밑에 위치한다.


application.properties에 설정하는 것만으로 DB 및 Mybatis 연동이 끝난다.
# ----------------------------------------------------------------------------------------------------
# DataSource Config
# 설정 참조 http://jsonobject.tistory.com/225
# ----------------------------------------------------------------------------------------------------
spring.datasource.type=org.apache.tomcat.jdbc.pool.DataSource
#spring.datasource.driverClassName=com.mysql.cj.jdbc.Driver
spring.datasource.url=jdbc:mysql://localhost:3306
spring.datasource.username=username
spring.datasource.password=password
spring.datasource.connectionProperties=useSSL=false;characterEncoding=UTF-8
spring.datasource.initSQL=SELECT 1


# ----------------------------------------------------------------------------------------------------
# Mybatis Config: http://www.mybatis.org/spring-boot-starter/mybatis-spring-boot-autoconfigure/
# ----------------------------------------------------------------------------------------------------
mybatis.type-aliases-package=mysample.boot.mybatis.domain
mybatis.mapper-locations=classpath*:/mapper/**/*.xml
mybatis.mapper-locations 는 mapper XML 위치를 설정하는 config로 위 구성과 같이 resources밑에 둔다. spring.datasource.driverClassName 를 지정하지 않으면 기본값이 자동 지정된다.

마지막으로 위 구성과 같이 @Mapper 어노테이션을 사용하는 UserMapper.java 인터페이스와 query를 작성하는 XML 파일을 생성하면 된다.

2017년 6월 28일 수요일

Spring Boot web app을 war로 배포 및 devtools

소스:

https://github.com/julyinsung/springboot/tree/master/boot_mvc_war_deploy

환경:

Type: gradle, Packaging: Jar, Java Version: 1.8
Boot Version: 1.5.4
Dependencies: Web, Thymeleaf
Tomcat: 1.8

개요:

Spring Boot을 이용하여 Web 프로젝트를 만들고 이를 war파일로 만들어서 Tomcat에 배포
devtools를 이용하여 java파일 수정시 자동으로 서버 재시작

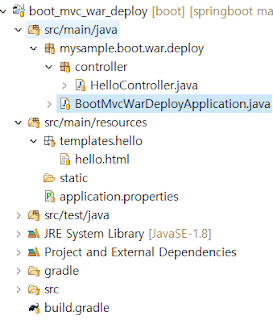
프로젝트 구성은 아래와 같다.


프로젝트 생성후 메인 클래스에 아래와 같이 configure() 메소드를 추가한다.
@SpringBootApplication
public class BootMvcWarDeployApplication extends SpringBootServletInitializer {


 @Override
 protected SpringApplicationBuilder configure(SpringApplicationBuilder application) {
  return application.sources(BootMvcWarDeployApplication.class);
 }


 public static void main(String[] args) {
  SpringApplication.run(BootMvcWarDeployApplication.class, args);
 }
}
build.gradle파일에 아래 코드를 추가한다.
dependencies compile('org.springframework.boot:spring-boot-devtools')을 추가한다.
apply plugin: 'war'

war {
    baseName = 'ROOT'
    //version = '0.0.1-SNAPSHOT'
}

dependencies {
 compile('org.springframework.boot:spring-boot-starter-thymeleaf')
 compile('org.springframework.boot:spring-boot-starter-web')
 compile('org.springframework.boot:spring-boot-devtools')
 testCompile('org.springframework.boot:spring-boot-starter-test')
}
[프로젝트 명 마우스 오른 클릭 > Gradle > Refresh Gradle Project ]를 하면 Gradle Tasks 의 build Task에 war 이 생성된다. war를 클릭하면 파일이 생성되며 생성된 파일은 [프로젝트폴더 > build > lib] 에 위치한다.


ROOT.war로 생성된 파일을 Tomcat에 넣고 실행하면 결과를 볼 수 있다.
Tomcat에 배포하지 않고 IDE상에서 확인하기 위해서는 [Run As > Spring Boot App] 을 실행한다.

2017년 6월 22일 목요일

ObjectAid UML - 클래스다이어그램 Eclipse Plugin

Eclipse에서 코드를 Class Diagram으로 변환해 주는 Plugin.
작성한 클래스들의 구조를 볼때 유용하게 사용할 수 있다.

참조

설치: http://www.objectaid.com/installation


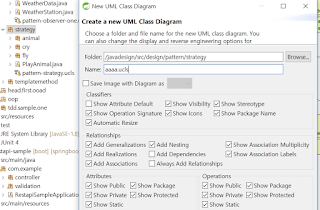
설치가 완료되면 그림과 같이 New > Other... > Objectaid UML Diagram > Class Diagram을 선택한다.

Next를 선택하여 그림과 같이 이름을 넣고 Finish버튼을 클릭하면 파일이 생성된다.

생성된 파일을 선택하면 빈 화면이 나타나게 되는데 빈 화면에 클래스를 끌어다 놓으면 Class Diagram을 생성해 준다.  생성된 Class Diagram은 이미지로 저장할 수 있다.


2017년 6월 15일 목요일

Vertx 연습 - web

소스: 

https://github.com/julyinsung/vertx_sample/tree/master/vertx-web

참고:

vertx-web: http://vertx.io/docs/vertx-web/java/
rest example: https://github.com/vert-x3/vertx-examples/blob/master/web-examples/src/main/java/io/vertx/example/web/rest/SimpleREST.java

환경:

vertx 3.x, java1.8, Eclipse

개요:

vertx의 web 라이브러리를 이용하여 간단한 rest api서버를 만들고 mongodb에 조회및 insert 기능.
rest 구현 클래스와 mongodb 클래스는 eventbus를 이용한다.

설명:

vertx web을 사용하기 위해서는 pom.xml에 dependency를 추가한다.

vertx web에서 HTTP request를 해당 URL로 매칭하기 위해서 Router를 사용한다.

보내는 쪽은 send를 받는 쪽은 consumer메소드를 사용한다.
당연히 address는 같아야 한다.
vertx.eventBus().send(address, message, handler)
vertx.eventBus().consumer(address, handler)

2017년 6월 12일 월요일

Bracketeer: the ultimate bracket plugin

Eclipse Editor 창에서 bracket을 강조해주는 plug-in.

참조: https://mcuoneclipse.com/2012/06/10/bracketeer-the-ultimate-bracket-plugin/

Marketplace에서 Bracketeer로 검색하여 설치가능.